Create an Autumn table display without carving a pumpkin
- Lisa from MollyMac

- Oct 17, 2021
- 4 min read
Updated: Sep 19, 2023
I like everything about Autumn except CARVING PUMPKINS. As an artist who is partial to a craft project, I am aware of how out of character this may sound. However, there is something about having to get hands-on with pumpkin pulp that makes my stomach churn.

Last Halloween I set out with all the best intentions: my Pinterest board of carving ideas at the ready and gourds of all shapes and sizes lined up on my kitchen table. Everything was prepped for me to carve the most elaborate collection of Halloween pumpkins that the world had ever seen. Fifteen minutes later, I had pumpkin juice in my hair, pulp under my fingernails and tears streaming down my face.
"I just want an Instagrammable autumn table display without all the orange fleshy gunk!" I cried into the night

So, I vowed that this year was going to be different. I needed to come up with some ways to decorate my pumpkins that didn't make me want to hurl them against the wall. I thought I'd share these secrets with any of you, who like me, are pulp averse (unless of course, it's in a tasty soup - that's obviously worth the hassle!)
Top tip: The ultimate no-carving hack is to leave them as they are - pumpkins and gourds are pretty spectacular sans decoration!
Anyhow I get ahead of myself...
First things first: Arm yourself with some cash and tour the local honesty boxes or farmers' markets to pick up a few gourds and pumpkins.
Top tip: you are looking for gourds and pumpkins of different shapes and sizes, textures and colours to create the best displays - bonus points if you can find them with creepy, twisty stalks!
From here, I've come up with an easy way to decorate your pumpkins without getting out the carving knife!
PAINTED AUTUMN PUMPKINS
Step One: Buy, beg or find somewhere in your craft cupboard some acrylic paint.
I used pink, green and orange but any colour you fancy will be a good. It's lovely if they match your table runner or crockery, but if you are creating them for a Halloween party black or crimson might be effective.
Step Two: Paint the entirety of your pumpkin in a block colour. If you have a good thick brush this won't take long at all and is certainly neater than carving! You may need to do two coats to cover any imperfections and then leave your pumpkin to dry.
Top tip: By putting the pumpkin on a raised platform it was easier to turn it around and therefore it was a lot easier to paint. A pottery wheel is perfect or an Aunt Sally. I had a trivet but an upside bowl, piece of wood or plate would do just as well.
Step Three: Keep it simple and paint your patterns. What makes them look effective is putting a few together - you do not have to create intricate designs.
Top tip: If you have a long hair paint brush that will definitely make your life easier. I mean a paint brush with the brush part being quite long maybe a few centimetres or 3/4"
Step Four: Let your painted pumpkin dry. You may want to add a little more detail with an art felt tip if you have one, like I did here it only took moments and was a SetaSkrib fabric marker from Pebeo but there are lots of art pens on the market which are equally good.
Top tip: Don't use a pen with a thin nib or it will pierce the skin of the pumpkin.
Step Five: If you want your pumpkin to last a while you can always paint or spray it with a matte varnish.
Top tip: Quick drying spray varnishes are the most convenient to use but do make sure you do this in a ventilated space because they can be a bit over powering.
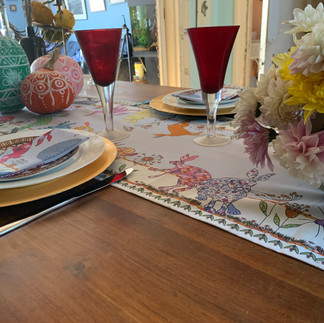
Step Six: Use your pumpkins to decorate your table! We've paired our pumpkin masterpieces with the 'Flick of Hares' table runner and matching napkins by MollyMac to really elaborate on the Autumn vibes and we've also mixed and matched our pumpkins with flowers, greenery, dried blooms and grasses. Matching plates and glasses are also really effective to get that cosy feel.
Step Seven: Cook and eat pumpkin soup!
Top tip: This soup was made by roasting the pumpkin or squash in the oven with some olive oil at 200 degrees centigrade for half an hour, turning once.
Recipe:
Fry two onions with a tablespoon of butter and a tablespoon of olive oil.
Make a litre of vegetable stock using hot water and a vegetable stock cube.
Add everything to a saucepan with a little seasoning, a pinch of chilli flakes and four tablespoons of crème fraîche. Cover and allow to cook on a low heat until soft.
Liquidise with a stick blender.
Topping crème fraîche and some grated cheese.
Delicious, delicious! Enjoy your soup on your beautiful Autumnal table, dressed to impress and wonder why you ever carved pumpkins in the first place!
We would love to see some of your creations - tag us on social media with your work we'd love to see it.
That's all for now,

Love from us at MollyMac x
P.S. These are the cushions shown in a few of the photos. Shop the look below!


PrintWish is a custom printed apparel provider, which uses methods like screen printing, DTG, etc. for printing a wide range of clothing.
T-Shirt Printing Belfast
T-Shirt Printing Birmingham
T-Shirt Printing Bristol
T-Shirt Printing Cambridge
T-Shirt Printing Colchester
T-Shirt Printing Coventry
T-Shirt Printing Doncaster
T-Shirt Printing Dundee
T-Shirt Printing Peterborough
T-Shirt Printing Edinburgh
T-Shirt Printing Essex
T-Shirt Printing Glasgow
T-Shirt Printing Gloucester
T-Shirt Printing Kent
T-Shirt Printing Leeds
T-Shirt Printing Liverpool
T-Shirt Printing London
T-Shirt Printing Cardiff
T-Shirt Printing Manchester
T-Shirt Printing Northampton
T-Shirt Printing Nottingham
T-Shirt Printing Oldham
T-Shirt Printing Sheffield
T-Shirt Printing Southampton
T-Shirt Printing Swansea
T-Shirt Printing Wakefield
T-Shirt Printing Aberdeen
T-Shirt Printing Bath
T-Shirt Printing Boumemouth
T-Shirt Printing Bradford
T-Shirt Printing Chester
T-Shirt Printing Chelmsford
T-Shirt Printing…